web analytics

Use coupon code 'HOLIDAYS' at checkout for a discount on many ASR branded items!

Kinetic Recovery Rope info/use

ASR has been making Kinetic Recovery Ropes since 2011.  Kinetic Recovery Ropes (also known as a snatch ropes or yanker ropes) are designed to stretch, to smoothly transfer the kinetic energy of a recovering vehicle to a vehicle that is stuck.  The ability of a Kinetic Recovery Rope to stretch is what makes it unique and what sets it apart from a non-elastic tow rope or tow strap.  ASR Offroad's Kinetic Recovery Ropes are designed and built for the express purpose of stretching under load, to provide a smooth and powerful pull.  Some key features that set our Kinetic Recovery Ropes apart:

  • 100% MILSPEC Double Braid Nylon.
  • No solution dyes (solution dyed Nylon can have an approx 10% lower MTS).
  • Professionally spliced in the US.
  • Abrasion protection in the eyes and on the rope body.
  • Optional fiber-lock coating of the exterior in a custom color.
  • Up To 20% Elongation when used properly while under load (30% stretch at Breaking Strength). 

Benefits of Using ASR's Kinetic Recovery Ropes over other recovery/tow equipment:

  • More durable and therefore less susceptible to damage from normal wear and tear.
  • Decreased shock loads on Recovery Mounting Points.
  • Able to transfer significant kinetic energy, even when the "assist vehicle" is much smaller than the "stuck vehicle".
  • Superior performance even in very low traction situations.
  • Lightweight and portable.

How to Correctly Use Your Kinetic Recovery Rope

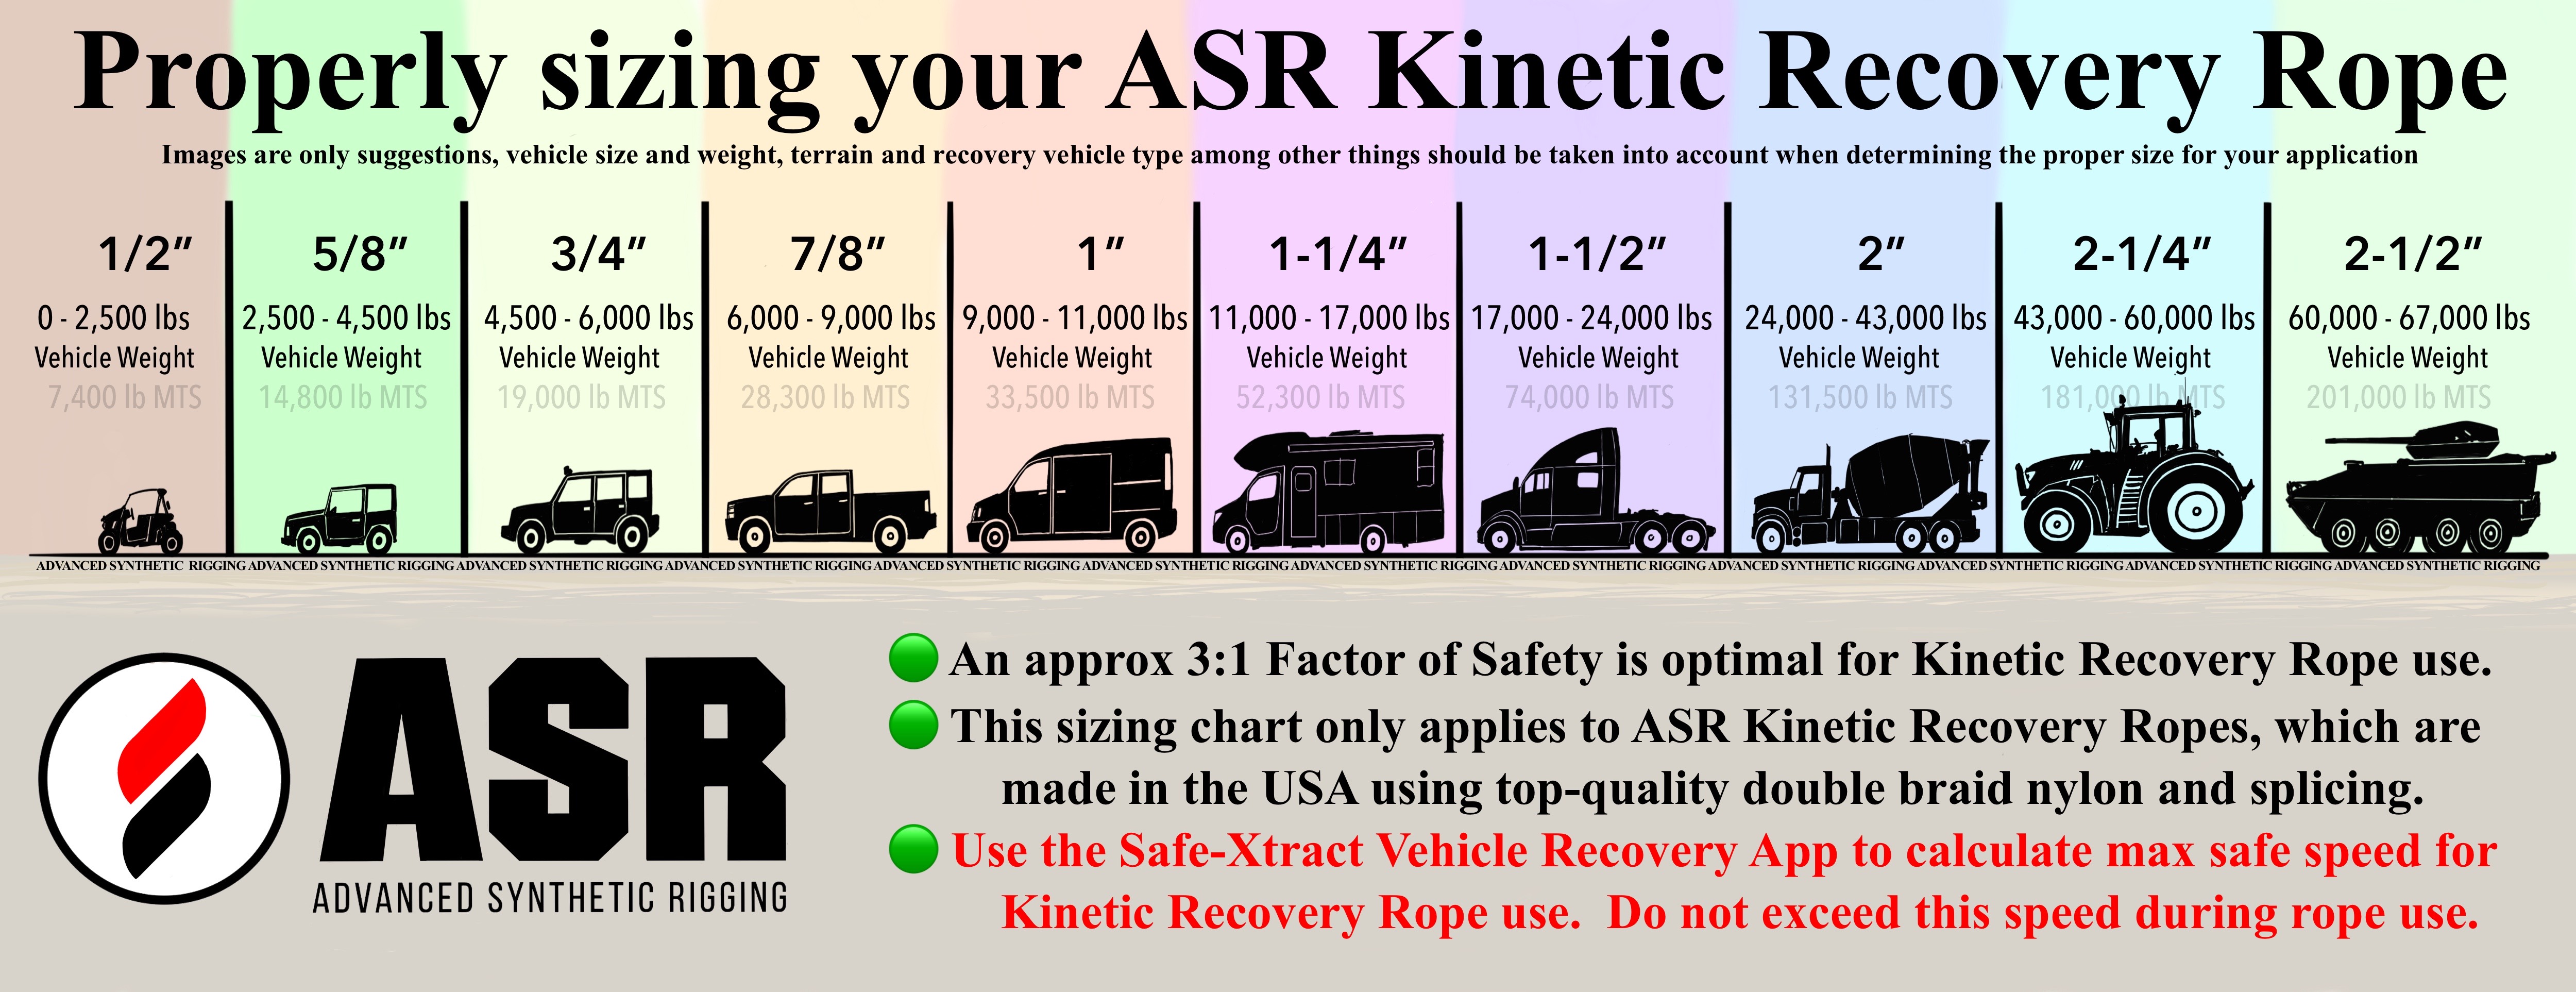
Before Beginning: Verify your equipment is adequate for the use and in good condition.  A Kinetic Recovery Rope should be sized such that the Minimum Tensile Strength (MTS or 'minimum breaking strength) is roughly 3 times the Gross Vehicle Weight of the vehicle conducting the recovery.  To properly select a rope for your vehicle, follow the guidelines on the chart below.

img-4425.jpg

Kinetic Recovery Rope Specifications & Selection

Many environmental factors such as slope, type and consistency of terrain the vehilce is mired in, and mire depth all play a role in determining the force that will be required to recover the stuck vehicle - the Safe-Xtract Vehicle Recovery App (available for both Android and iOS devices) does an excellent job of calculating a total resistance based on all these factors and more.  In extreme environmental conditions, it may be desirable to increase rope diameter by one level.  We do not recommend decreasing the diameter for lighter environmental conditions.
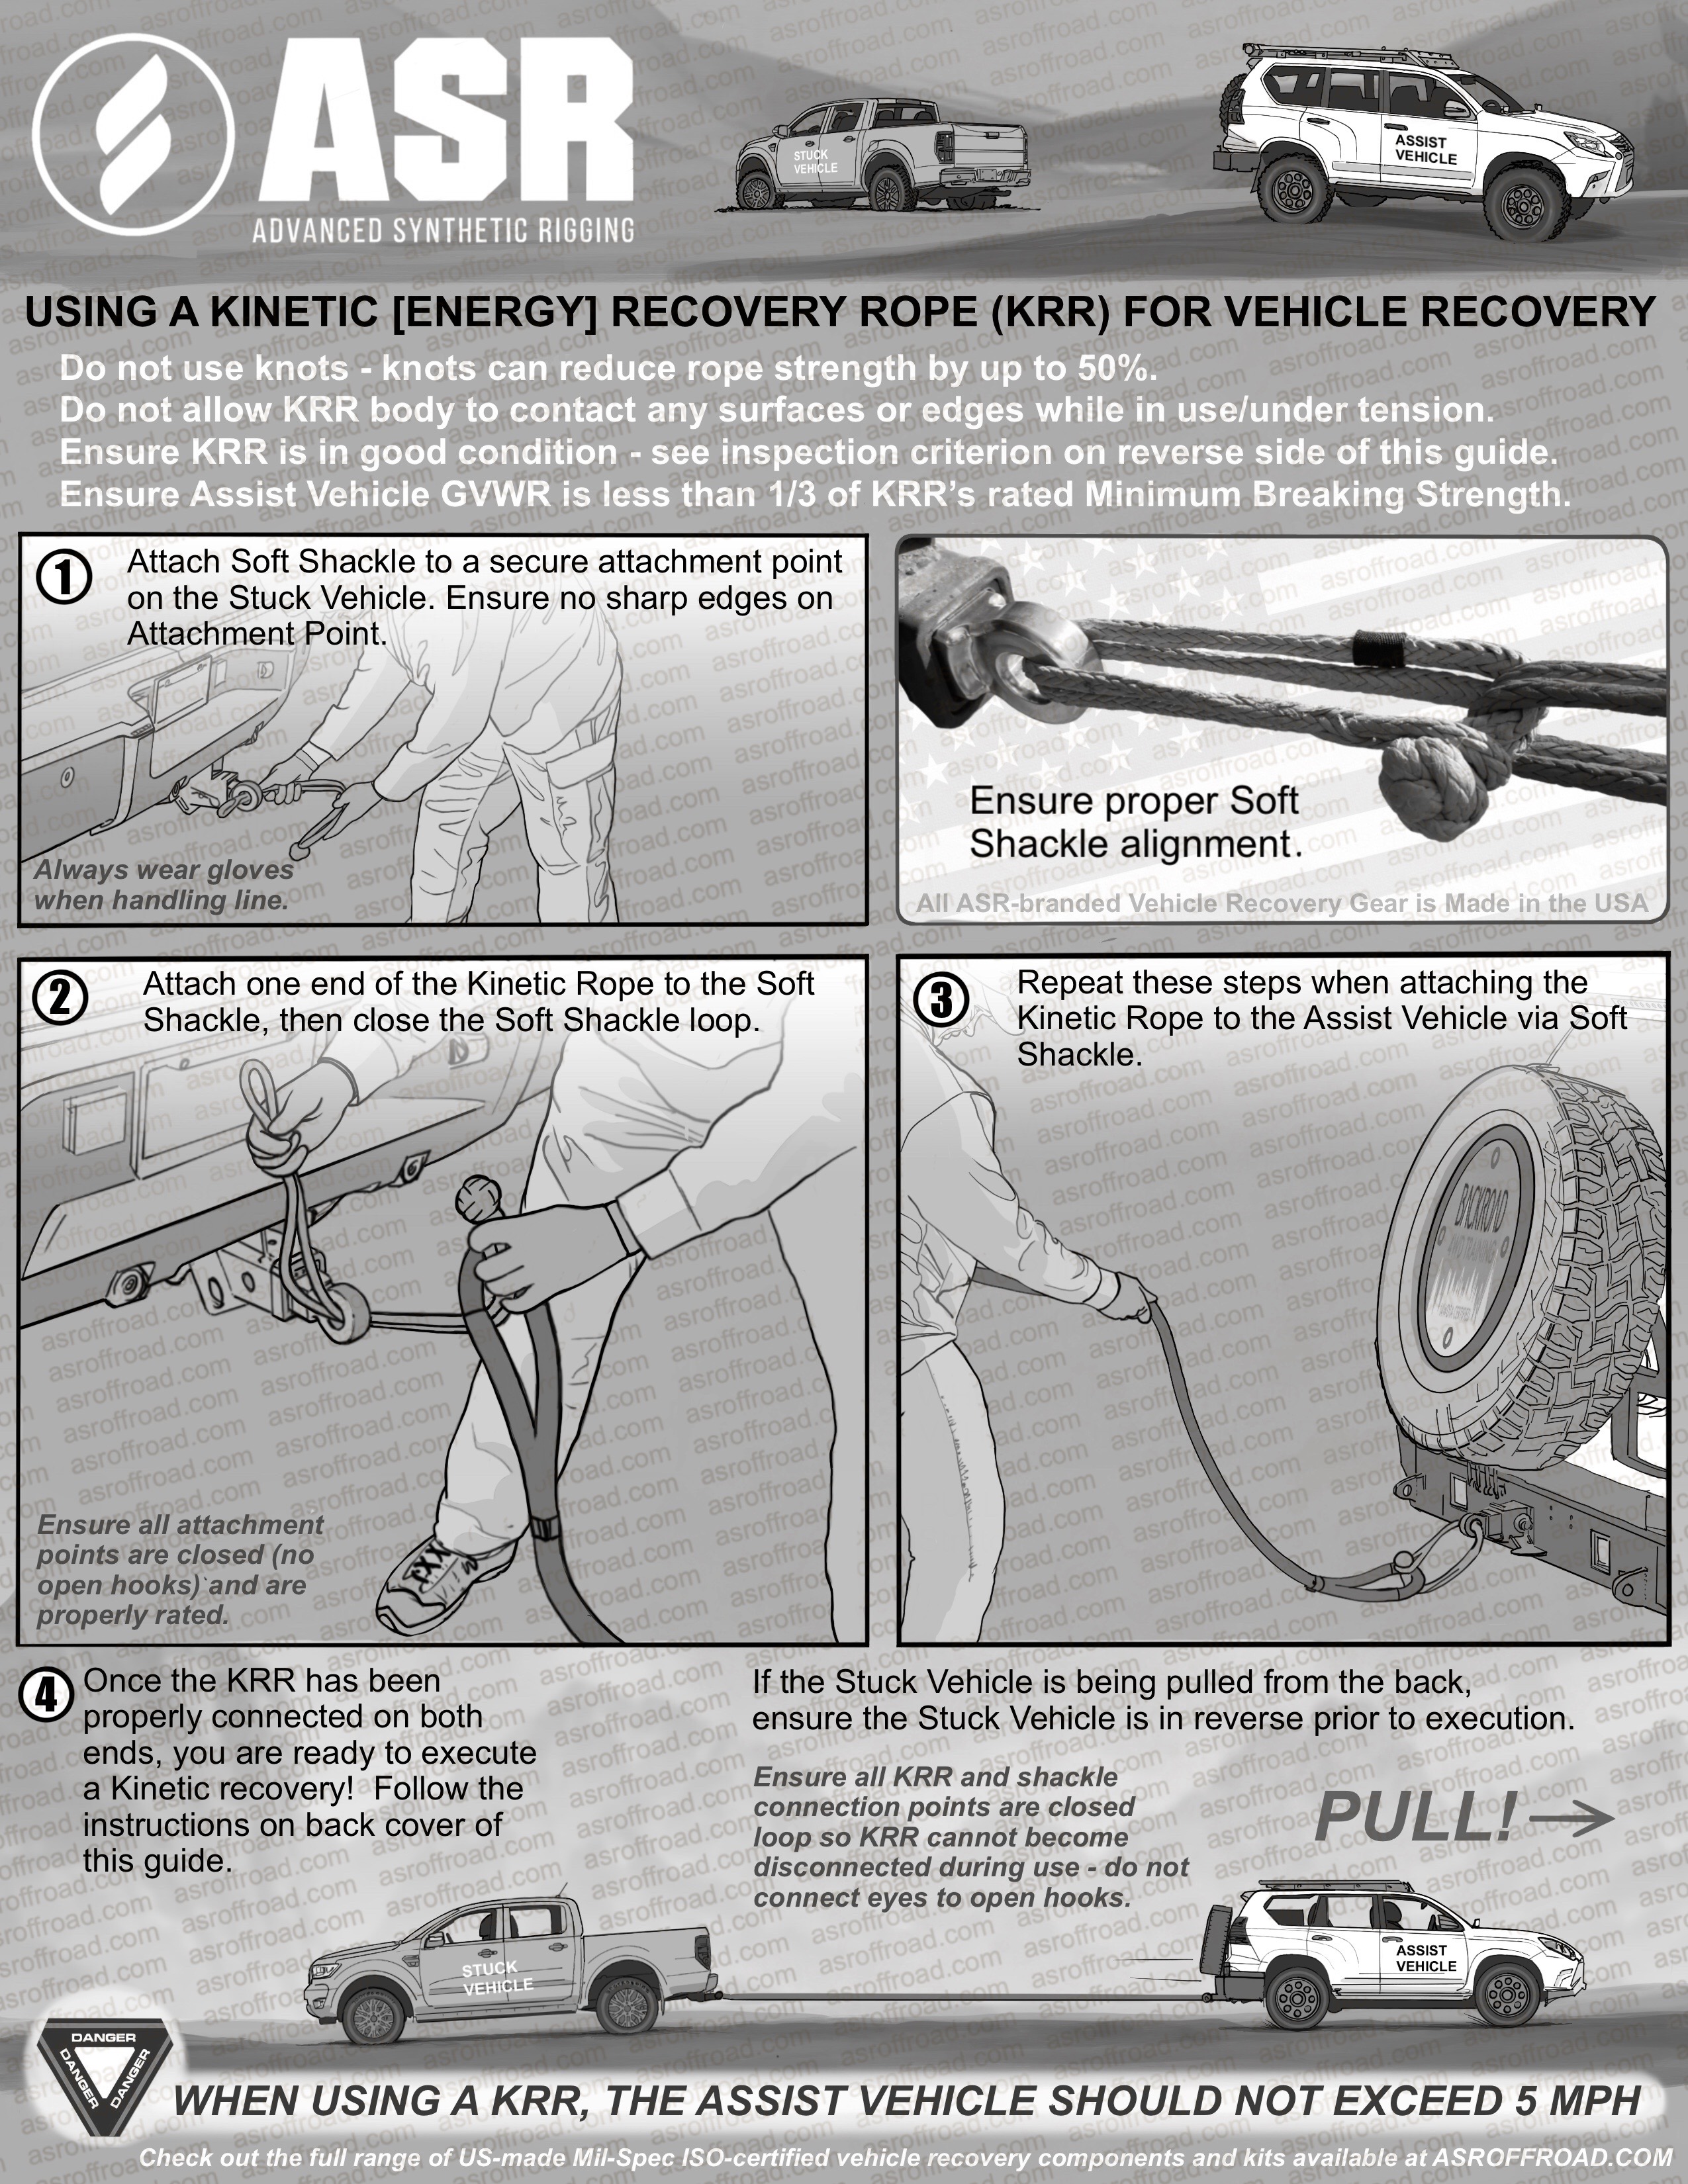
 

img-6173.jpg
 
Step 1: Designate a straight path for use by the Assist Vehicle.  This path determines the direction for the pull.  This “Recovery Path” should enable an in-line pull and not require a pull to the side.  If it is easier to pull the Stuck Vehicle back out from where it came instead of pulling it forward, orient the Assist Vehicle in the opposite direction of the Stuck Vehicle – the Assist Vehicle should always be driving forward, never in reverse.
 
Step 2: Identify a stopping point and ensure both the Assist Vehicle driver & the Stuck Vehicle driver are informed of the stopping point. 
 
Step 3: Clear the area under & around the wheels of the Stuck Vehicle to reduce the total resistance to the recovery effort as much as possible. 
 
Step 4: Remove hinderances to forward progress along the Recovery Path wherever possible.
 
Step 5: Use a Soft Shackle to connect the KRR to the Stuck Vehicle via a secure, properly rated pull point with no sharp edges.  Ensure all recovery points being used are ‘closed’.  Do not connect a KRR to an open hook or other such ‘open’ point where they can easily come off. 
 
Step 6: Ensure the Stuck Vehicle’s steerable wheels are oriented in the Recovery Path’s direction.
 
Step 7: Extend the KRR down the Recovery Path.
 
Step 8: Place the free end of the KRR down onto the Recovery Path, at the point closest to the Stuck Vehicle to which you can safely bring the Assist Vehicle. 
 
Step 9: The Assist Vehicle should approach the connection point in reverse. When the Assist Vehicle is close enough to connect the KRR, the Assist Vehicle driver should stop and place their vehicle in either Neutral or Park and put on the brakes. Confirm the reverse lights are off and the brake lights are on before connecting the KRR to the Assist Vehicle.
 
Step 10: The Stuck Vehicle driver should help the Assist Vehicle by driving along the Recovery Path during the recovery, taking care not to spin their tires excessively. 
 
Step 11: When the Assist Vehicle driver reaches the agreed upon stop point, they should stop.  The Stuck Vehicle driver must apply their brakes when they see the brake lights on the Assist Vehicle illuminate.
 
Step 12: The Stuck Vehicle driver must avoid driving over the KRR at all times, especially when stopping. 
 

WARNING:  ROPE FAILURE CAN CAUSE SERIOUS INJURY OR DEATH.  When using a Kinetic Recovery Rope, the Assist Vehicle should not exceed 5 mph.  If the Assist Vehicle pulls the rope tight at too high a speed, the resulting ‘shock loading’ can damage or even break the attachment point, vehicle frame or KRR.  The user is responsible to determine the suitability of a rope for specific applications.